I have now downloaded the Adobe Photoshop CS5 30 day trial onto my laptop so I would be able to edit some of the photos from Sunday's 'photoshoot'. The salvageable pictures have been relatively easy to edit despite my dislike for the quality.
The stage was lit too dimly, which there was no time to correct due to being ushered out of the location, and so the photos are not correctly exposed, with this I lengthened the shutter speed slightly but not enough to pick up hand shake or movement of the girls.
I tried a range of shots however the ones that I am fairly happy with are medium close ups
As you can see below, the lighting is not consistent, especially with the third picture, however, these are only the first edits and I will try to edit the light to be more similar.
These were originally in colour however I think the pictures are more flattering in black and white. This was due to the make up worn by the girls, causing uneven skin tone, which was enhanced by the lights. Whereas the black and white balances the skin tone and allows for easier editing.
I think the pictures could have been improved by lighting them properly, using stage lights means the subject was only lit by front lights, whereas if one of us got the light certificate, the stand alone light could be set up near a window so there would be light reflected from the front and the side, and Connor would have held a light reflective sheet on the other side where there was not a light source. In professional photography it is important to correctly light the subject so that correct exposure is achieved which displays more texture and detail in all the features.

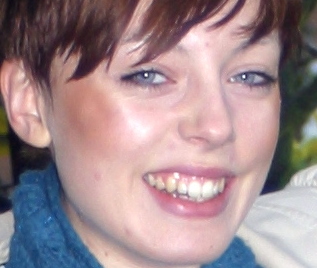
This photo is particularly incorrectly lit and exposed as the detail in the women's hair has been lost, this means that I cannot add any interesting contrast or make the photo lighter as it can make the hair quality worse. It is fairly acceptable at the minute but I aim to edit the eyes to make them stand out more in the hopes of distracting from the hair. I have removed a few lines and shadows on the nose and around the eyes as general maintenance of the image.

This photo is borderline acceptably lit, however, texture is lost in the shadowed areas near the ears and the hairline. It is also not as sharp as the picture should be, but this was due to the lengthened shutter speed to try and get more light into the photo. I have to be careful with the ‘Sharpen tool’ in Photoshop as it can make the picture too pixelated if zoomed in or printed largely.

The photo on the right has been the most problematic to edit, firstly the lady had the opposite shoulder forward, whereas the other two had the same shoulder forward. I did not have time to take more shots and so to amend this problem, I used MS Paint to 'flip the picture horizontal' which has made the image look consistent with the others. The lady also tended to squint in every photo and so I have edited her eyes slightly so they appear more open, I did this with the ‘liquify’ tool on photoshop. This picture is also quite blurry, there is no detail in the necklace and the hair.
I am already familiar with Adobe Photoshop as it used to be a pass time to just play around with photos, doing this I believe I have a good knowledge of the software and so have been confident with the ability to edit photos.
Below are some examples of how I have edited past photos in order to practice using the software:

The colour has been saturated in the lips and the eyes have been brightened.


The colour in the background has been significantly reduced using the 'desaturate tool'.
The skin in this picture has been the most problematic, most of the skin has been taken and replicated from a single patch as unfortunately her skin was not in good condition.

This picture has been edited by increasing the saturation of the green in the nearest looking hillside whilst desaturating the furthest away. I have also sharpened the pile of stones and increased the colours in them using the 'ctrl m' and 'ctrl l' shortcuts.
As I keep badgering on about it, my entire gallery can be seen as evidence of my Photoshop knowledge.
No comments:
Post a Comment